1961 Volkswagen SO-23 Camper - SB
Here is my 1961 Westfalia camper. I bought in in April of 2000 for
$1000. To the left is the picture I got, that sent me to the Pacific Beach area of San Diego in a hurry.
 While it wasn't a beaut by any means, it was rather complete as far as interior goes. The guy that I bought it from, removed the tent
and the Ambulance fans and sold it to me for what he paid. It would have been nice to get the tent and fans, but for $1000 61 Westy who
can complain.
When I brought it home, I already had two busses in the garage and my then girlfriend wasn't happy to see a third
come rolling into the driveway. So needless to say her label for my beloved new bus sort of stuck and so she was named... "Stupid
Bus" or "SB" as I like to call her. While she is a great bus she
did have a few problems. The folder of receipts showed that the owner before the guy I bought her from had a
starting problem and took her to City VW, who put in a rabbit starter, which
destroyed the flywheel and ate up the hole for the starter input shaft.
This and the death of his beloved traveling/hanging out in the bus dog, coerced
him into selling the bus. Besides the few engine things, there were cut
wheel wells, some knarly bumper bracket mounts on the front and the entire roof
was in really bad shape. The bottom 3 inches above the drip rail were made
of Bondo, Fiberglass, Chicken Wire, Aluminum foil and even a coffee can.
But she was a '61 westy. For the first year I drove her around and just
enjoyed getting from point A to Point B. A few shows here and there, a
camp out or two and a little work and clean up here and there. In March of
2001, my then girlfriend, Sarah and I went camping with the Strictly Vintage
Type 2's in Ramona California. While not real mountains, they are considered
the mountains around San Diego. Being as it was March, the so-called rainy
season of So-Cal wasn't quite over and we got wet. The rain was coming
down pretty good, and my Home Depot, blue tarps seemed to be doing a pretty good
job. Water was leaking in here and there, but it didn't appear to be
anything insurmountable. But with no site of the rain letting up, I opened
the doors to ask her what she wanted to do, "Stay or Go". Sarah
already had a cold so she was fully dressed, with a sweatshirt, and bundled up
in one of those sleeping bags that have the draw string to tighten around your
face and a beanie. So her reply came back as a nasally "I don't
care". In the midst of her reply a drop of water came in from the
sub-hatch. Why is all this relevant? Because it explains why I've been
bus-less at all of the events since. I slammed the doors shut, gave a wave
to the SV2's hard core campers still left and we were gone. Water slipping
by the duct tape, and coming in from every direction, but we were heading
home. For the next day or two she sat out in the garage drying out, but I
had already decided what to do. SB needed a whole new lid
While it wasn't a beaut by any means, it was rather complete as far as interior goes. The guy that I bought it from, removed the tent
and the Ambulance fans and sold it to me for what he paid. It would have been nice to get the tent and fans, but for $1000 61 Westy who
can complain.
When I brought it home, I already had two busses in the garage and my then girlfriend wasn't happy to see a third
come rolling into the driveway. So needless to say her label for my beloved new bus sort of stuck and so she was named... "Stupid
Bus" or "SB" as I like to call her. While she is a great bus she
did have a few problems. The folder of receipts showed that the owner before the guy I bought her from had a
starting problem and took her to City VW, who put in a rabbit starter, which
destroyed the flywheel and ate up the hole for the starter input shaft.
This and the death of his beloved traveling/hanging out in the bus dog, coerced
him into selling the bus. Besides the few engine things, there were cut
wheel wells, some knarly bumper bracket mounts on the front and the entire roof
was in really bad shape. The bottom 3 inches above the drip rail were made
of Bondo, Fiberglass, Chicken Wire, Aluminum foil and even a coffee can.
But she was a '61 westy. For the first year I drove her around and just
enjoyed getting from point A to Point B. A few shows here and there, a
camp out or two and a little work and clean up here and there. In March of
2001, my then girlfriend, Sarah and I went camping with the Strictly Vintage
Type 2's in Ramona California. While not real mountains, they are considered
the mountains around San Diego. Being as it was March, the so-called rainy
season of So-Cal wasn't quite over and we got wet. The rain was coming
down pretty good, and my Home Depot, blue tarps seemed to be doing a pretty good
job. Water was leaking in here and there, but it didn't appear to be
anything insurmountable. But with no site of the rain letting up, I opened
the doors to ask her what she wanted to do, "Stay or Go". Sarah
already had a cold so she was fully dressed, with a sweatshirt, and bundled up
in one of those sleeping bags that have the draw string to tighten around your
face and a beanie. So her reply came back as a nasally "I don't
care". In the midst of her reply a drop of water came in from the
sub-hatch. Why is all this relevant? Because it explains why I've been
bus-less at all of the events since. I slammed the doors shut, gave a wave
to the SV2's hard core campers still left and we were gone. Water slipping
by the duct tape, and coming in from every direction, but we were heading
home. For the next day or two she sat out in the garage drying out, but I
had already decided what to do. SB needed a whole new lid
That week I put the word out, that if anybody was cutting anything up, or
if they knew anybody who might be, I needed a new roof. It didn't take
long. I ended up talking with Scott McWilliams, a long time SV2's member, who had a deal
going for a donor bus for his lunch wagon project and a spare roof coming out
from New Mexico. The roof was included in the deal to fill the huge
pop-top hatch hole cut into the donor busses roof. After a little
brainstorming we figured out Scott could do his project with out the use of the
spare roof. With the help of a few friends, Randy of Randar Wheels fame, my
roommates Kevin and Scott we got the roof loaded on Randy's flat bed trailer,
over to my house and up on top of Jack ('59 bus) until I was ready for it.
The roof was from a mid 60's bus so it had a few little differences from the
roof a '61, but they are pretty small and won't be seen with the interior back
in.
With the roof now at my house, work could begin. After some analysis, I
figured that everything below the drip rail was in good
shape on the bus, and the clip was cut mid window, so I had plenty to work with.
As the rear hatches were different, and there was no problem with the tops of my
windows, it made no sense to remove anymore metal from the bus than I really had to. So it
was decided that the bus would keep every thing from below the actual drip rail
structure. Part one: Dismantling the bus. While the pop-out window screws soaked
in the liquid wrench, I removed all of the interior cabinets, seats, and
panels. The only thing left in the bus is the steering wheel covered with
a wet towel (just in case I had to move the bus). Most of the pop-out
screws came out with just a couple of douses of liquid wrench while others
needed a some rubber malletting and some persuasion. What I did find to
work really well against breakage, was once I had movement in the screw, I
housed it down and screwed it in and out over and over again loosening it a
little more with each turn. With this method, not one screw broke.
It was great.

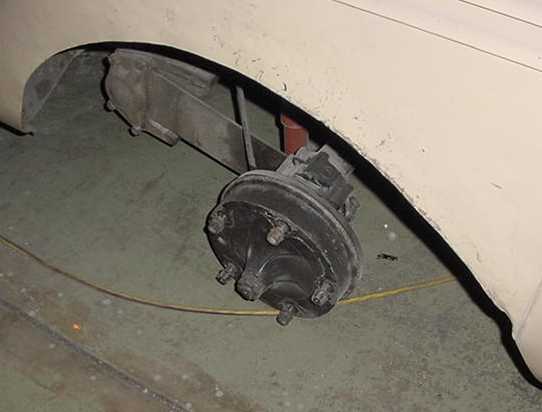
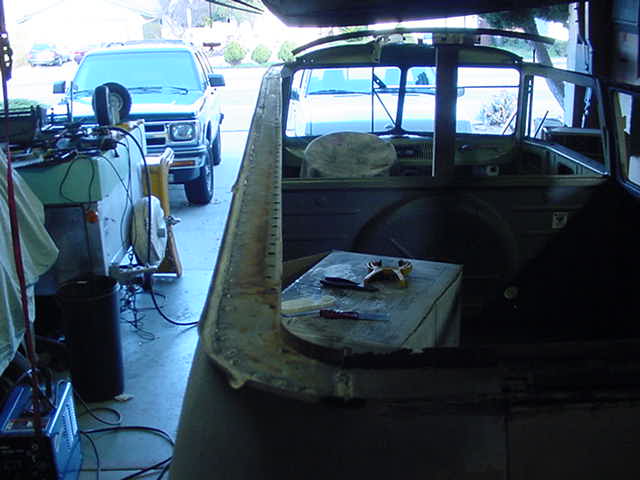
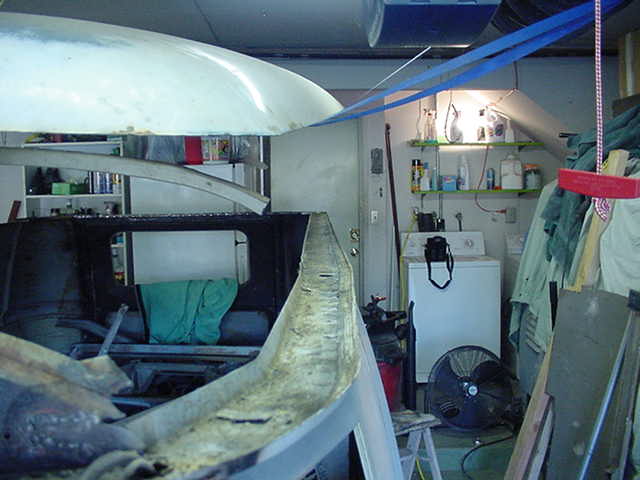
 In order to get the bus lower to the ground for all this
roof work, the wheels were removed so that it was sitting on drums, still
roll-able and even lower than I expected. Here you also notice the cut wheel wells that
I'm replacing.
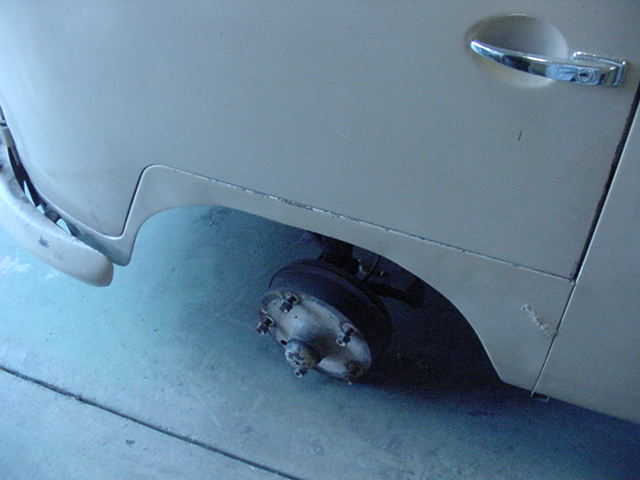
In order to get the bus lower to the ground for all this
roof work, the wheels were removed so that it was sitting on drums, still
roll-able and even lower than I expected. Here you also notice the cut wheel wells that
I'm replacing.
Removing the existing roof. This was pretty easy because my roof
was so rusted out. I decided to save my fresh air duct as it
is slightly different from that of the new roof. I ordered a few spot weld
cutters from Northern Tool and Equipment and proceeded to drill out the spot
welds that held the air duct to the roof. If you haven't drilled out a
spot weld before, there really isn't much to it once you find it. I found
that a grinder with a wire wheel removed the paint quickly and made finding the
spot welds on the clean metal real easy. I also used a metal putty knife
and a rubber mallet to get through any of the spot weld the cutter might have
not fully cleared. Mistakenly I drilled out all of the spot welds that held
the
two roof supports to the bus, with the premise of using these in the finished
product. With all of the spot welds cut, I could use the air hammer, to
power right through the
rotted metal, Bondo concoction. Now the bulk of the roof was removed and
the drip rail assembly was left. Up to this point I had hoped I would be
able to salvage the inner drip rail assembly, but this was not the case.
It too was very well rusted out and needed to be removed. At this point
I decided to switch my efforts to the new roof and begin removing any excess
metal
there. Basically all the metal below the drip rail needed to be removed
as
well as the hardware and mountings for the mid '60s rear hatch. (Mid 60's
hatch is spring loaded as earlier busses aren't). Using the die grinder
cut off tool with a 3" blade I cut as close to the drip rail as possible
leaving me plenty of window frame metal to be used on some other project bus
at
a later date. Then the electric grinder to grind the metal down, find
the
spot welds and small screw driver rubber mallet combination to lift the metal
and grind some more. This process limited the amount of metal being
removed from the drip rail and allowed just spot welds to be ground easier.
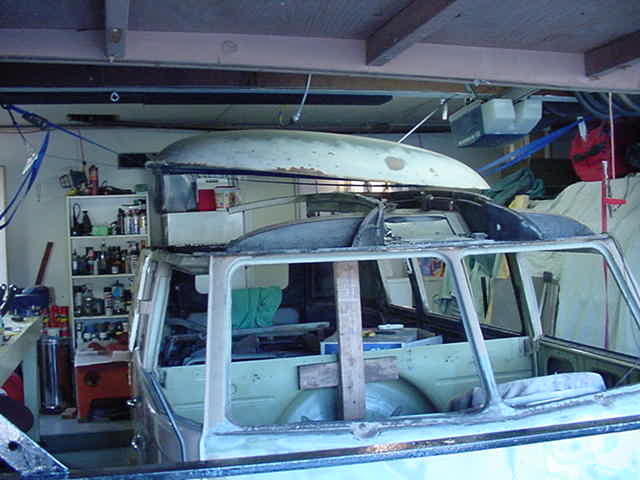
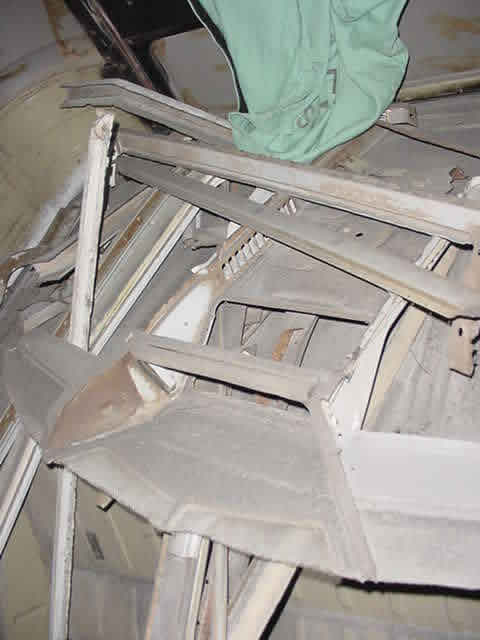
 Here are a couple pics of the roof suspended above the bus with
all of the metal removed from it. I also removed the fresh air duct
and from the new roof as the one in the bus was in good shape and different
because of the difference in years.
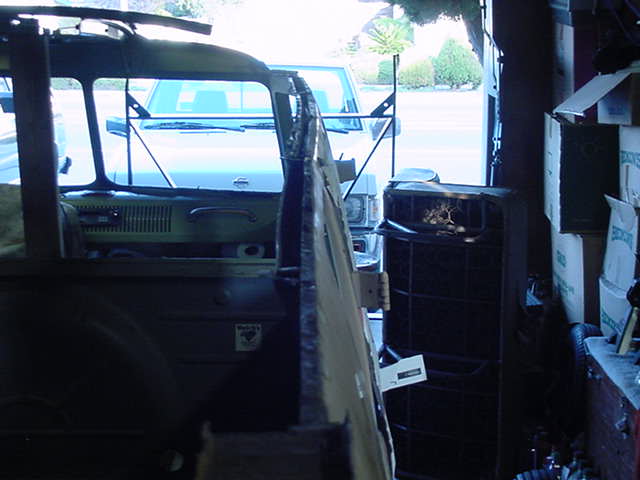
Here are a couple pics of the roof suspended above the bus with
all of the metal removed from it. I also removed the fresh air duct
and from the new roof as the one in the bus was in good shape and different
because of the difference in years.
New Roof
Separation: This next step was the most crucial to the entire project. There are four
parts that make up the roof on your bus. The cap, which is the most
prolific part that you see in the pictures. The roof supports that run
from side to side spot welded to the roof. The drip rail assembly that the
cap is spot welded to and a three part inner support that runs down each side
the length of the bus, and the third over the rear hatch. These inner

 supports are spot welded to the roof and to the drip rail assembly. I
decided that I could drill out all of the spot welds that hold the drip rail to
the inner supports and then make an incision in the cap where the roof curve
bends to lay flat in the drip rail. (By using this process, I was able to
weld the roof on in two stages and maintain the maximum rigidity of the roof
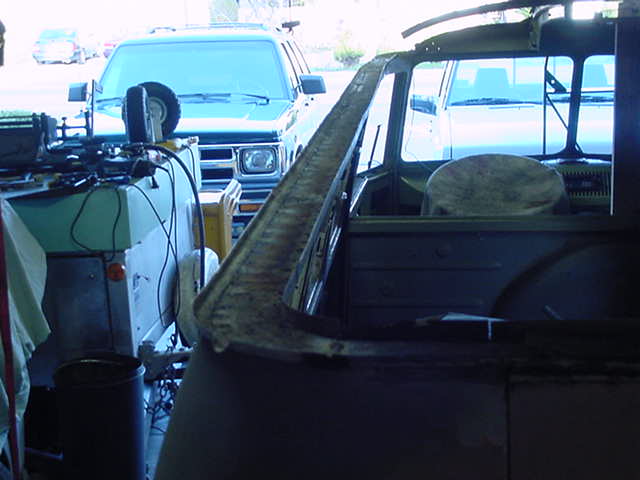
when the project was complete.) With the drip rail assembly removed
on each side I could remove the existing rusty drip rail off of the bus.
As this area was so rusted,
finding the spot welds holding the drip rail to the bus was impossible, so it
supports are spot welded to the roof and to the drip rail assembly. I
decided that I could drill out all of the spot welds that hold the drip rail to
the inner supports and then make an incision in the cap where the roof curve
bends to lay flat in the drip rail. (By using this process, I was able to
weld the roof on in two stages and maintain the maximum rigidity of the roof
when the project was complete.) With the drip rail assembly removed
on each side I could remove the existing rusty drip rail off of the bus.
As this area was so rusted,
finding the spot welds holding the drip rail to the bus was impossible, so it

 had to cut and grind it off.I did luck out big time in that the section from A pillar to A pillar around the
front was in good shape and needed very little work and that the rear hatch support was sturdy
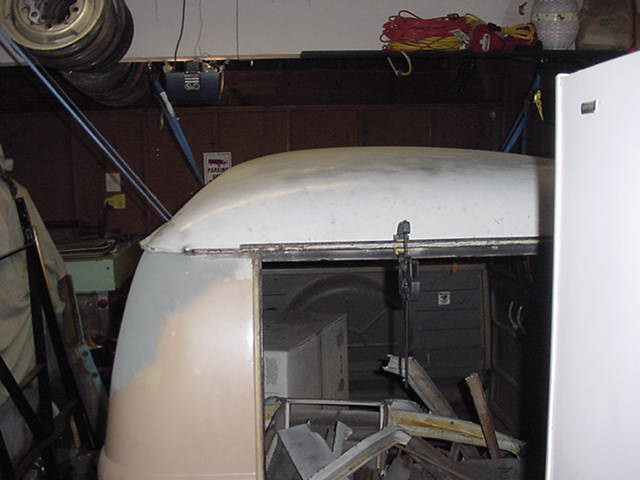
enough to repair and build off of. In the right picture, the bulge where it looks as though the bus is
bowing out is actually the cargo doors, as there is no top to support them from
opening out a bit.
had to cut and grind it off.I did luck out big time in that the section from A pillar to A pillar around the
front was in good shape and needed very little work and that the rear hatch support was sturdy
enough to repair and build off of. In the right picture, the bulge where it looks as though the bus is
bowing out is actually the cargo doors, as there is no top to support them from
opening out a bit.

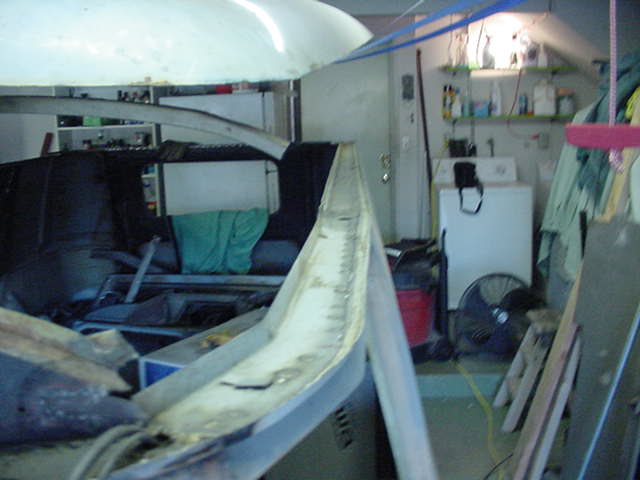
 To
attach the new drip rail assembly to the bus, I drilled holes in it where the
spot welds had been and welded it to the bus. I did have to manipulate
the metal a bit here and there but for the most part it really was that easy
once it was shaped to fit. Here are a couple of pics with the new drip
rail attached.
To
attach the new drip rail assembly to the bus, I drilled holes in it where the
spot welds had been and welded it to the bus. I did have to manipulate
the metal a bit here and there but for the most part it really was that easy
once it was shaped to fit. Here are a couple of pics with the new drip
rail attached.
As of right now 04-26-02 I'm waiting on all of the fresh air
duct rubber parts to come in so I can weld the cap back on . I've test fit
it twice and it is ready to go. While I'm waiting, I'm welding in the
wheel wells which will be another update here.

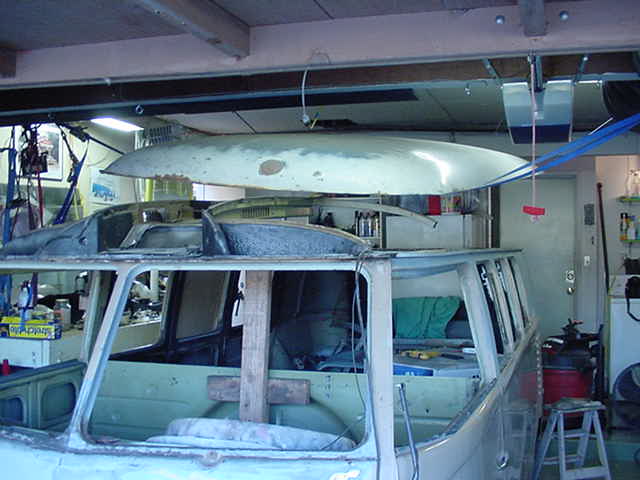
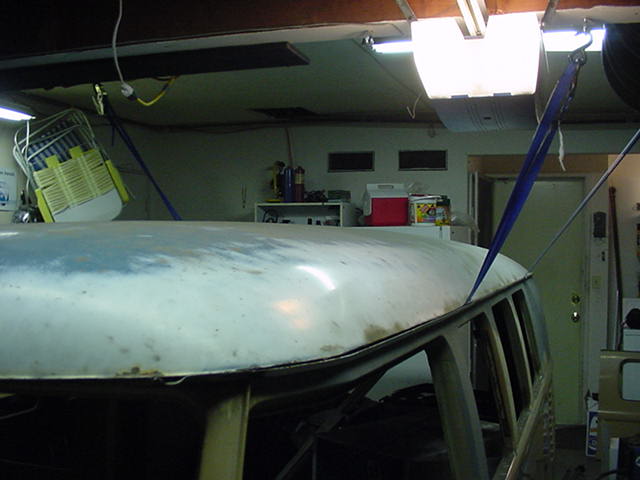
 Here are a couple of pics of the roof resting in place. These pictures
also show the ratchet straps that were bolted into the ceiling. This was
the most fun part of this job, because I was finally able to see the roof in
place. While no where near finished yet, the finished product was in sight. At
this point I rasied the roof back up and POR 15'd all of the inner components
of the drip rail and about 6 - 8 inches up the interior of the new Cap. I
did have to wire wheel the two surfaces when actually tacking came into play
as the POR 15 had been put on a little liberally in some places. Because
the
cap
was
seperated
from
the
Here are a couple of pics of the roof resting in place. These pictures
also show the ratchet straps that were bolted into the ceiling. This was
the most fun part of this job, because I was finally able to see the roof in
place. While no where near finished yet, the finished product was in sight. At
this point I rasied the roof back up and POR 15'd all of the inner components
of the drip rail and about 6 - 8 inches up the interior of the new Cap. I
did have to wire wheel the two surfaces when actually tacking came into play
as the POR 15 had been put on a little liberally in some places. Because
the
cap
was
seperated
from
the

 drip
rail and the drip rail was now secure to
the bus, I could follow the lines where the two were seperated and begin tacking
the two back together. I did have to rebuild the rear hatch mounting as
it was pretty rusty under there. Using some of the parts from the new roof
drip rail, a couple from the old rear hatch and a couple new ones, I was able
to rebuild it nice and sturdy and most importantly rust free.
drip
rail and the drip rail was now secure to
the bus, I could follow the lines where the two were seperated and begin tacking
the two back together. I did have to rebuild the rear hatch mounting as
it was pretty rusty under there. Using some of the parts from the new roof
drip rail, a couple from the old rear hatch and a couple new ones, I was able
to rebuild it nice and sturdy and most importantly rust free.
Main Tools used:
Miller 130 Mig welder. Best tool on the planet. I've welded with
others and nothing has beat it yet for this kind of work.
Die grinder cut off tool and 3" blade
Electric Grinder with grinding wheel
Electric Grinder with wire wheel
Drill with 1/4 spot weld cutter bit and 3/8 bit on a couple
Rubber mallet and various other every day tools
Last Modified
|
|
Click Images to enlarge!!!! |
 While it wasn't a beaut by any means, it was rather complete as far as interior goes. The guy that I bought it from, removed the tent
and the Ambulance fans and sold it to me for what he paid. It would have been nice to get the tent and fans, but for $1000 61 Westy who
can complain.
When I brought it home, I already had two busses in the garage and my then girlfriend wasn't happy to see a third
come rolling into the driveway. So needless to say her label for my beloved new bus sort of stuck and so she was named... "Stupid
Bus" or "SB" as I like to call her. While she is a great bus she
did have a few problems. The folder of receipts showed that the owner before the guy I bought her from had a
starting problem and took her to City VW, who put in a rabbit starter, which
destroyed the flywheel and ate up the hole for the starter input shaft.
This and the death of his beloved traveling/hanging out in the bus dog, coerced
him into selling the bus. Besides the few engine things, there were cut
wheel wells, some knarly bumper bracket mounts on the front and the entire roof
was in really bad shape. The bottom 3 inches above the drip rail were made
of Bondo, Fiberglass, Chicken Wire, Aluminum foil and even a coffee can.
But she was a '61 westy. For the first year I drove her around and just
enjoyed getting from point A to Point B. A few shows here and there, a
camp out or two and a little work and clean up here and there. In March of
2001, my then girlfriend, Sarah and I went camping with the Strictly Vintage
Type 2's in Ramona California. While not real mountains, they are considered
the mountains around San Diego. Being as it was March, the so-called rainy
season of So-Cal wasn't quite over and we got wet. The rain was coming
down pretty good, and my Home Depot, blue tarps seemed to be doing a pretty good
job. Water was leaking in here and there, but it didn't appear to be
anything insurmountable. But with no site of the rain letting up, I opened
the doors to ask her what she wanted to do, "Stay or Go". Sarah
already had a cold so she was fully dressed, with a sweatshirt, and bundled up
in one of those sleeping bags that have the draw string to tighten around your
face and a beanie. So her reply came back as a nasally "I don't
care". In the midst of her reply a drop of water came in from the
sub-hatch. Why is all this relevant? Because it explains why I've been
bus-less at all of the events since. I slammed the doors shut, gave a wave
to the SV2's hard core campers still left and we were gone. Water slipping
by the duct tape, and coming in from every direction, but we were heading
home. For the next day or two she sat out in the garage drying out, but I
had already decided what to do. SB needed a whole new lid
While it wasn't a beaut by any means, it was rather complete as far as interior goes. The guy that I bought it from, removed the tent
and the Ambulance fans and sold it to me for what he paid. It would have been nice to get the tent and fans, but for $1000 61 Westy who
can complain.
When I brought it home, I already had two busses in the garage and my then girlfriend wasn't happy to see a third
come rolling into the driveway. So needless to say her label for my beloved new bus sort of stuck and so she was named... "Stupid
Bus" or "SB" as I like to call her. While she is a great bus she
did have a few problems. The folder of receipts showed that the owner before the guy I bought her from had a
starting problem and took her to City VW, who put in a rabbit starter, which
destroyed the flywheel and ate up the hole for the starter input shaft.
This and the death of his beloved traveling/hanging out in the bus dog, coerced
him into selling the bus. Besides the few engine things, there were cut
wheel wells, some knarly bumper bracket mounts on the front and the entire roof
was in really bad shape. The bottom 3 inches above the drip rail were made
of Bondo, Fiberglass, Chicken Wire, Aluminum foil and even a coffee can.
But she was a '61 westy. For the first year I drove her around and just
enjoyed getting from point A to Point B. A few shows here and there, a
camp out or two and a little work and clean up here and there. In March of
2001, my then girlfriend, Sarah and I went camping with the Strictly Vintage
Type 2's in Ramona California. While not real mountains, they are considered
the mountains around San Diego. Being as it was March, the so-called rainy
season of So-Cal wasn't quite over and we got wet. The rain was coming
down pretty good, and my Home Depot, blue tarps seemed to be doing a pretty good
job. Water was leaking in here and there, but it didn't appear to be
anything insurmountable. But with no site of the rain letting up, I opened
the doors to ask her what she wanted to do, "Stay or Go". Sarah
already had a cold so she was fully dressed, with a sweatshirt, and bundled up
in one of those sleeping bags that have the draw string to tighten around your
face and a beanie. So her reply came back as a nasally "I don't
care". In the midst of her reply a drop of water came in from the
sub-hatch. Why is all this relevant? Because it explains why I've been
bus-less at all of the events since. I slammed the doors shut, gave a wave
to the SV2's hard core campers still left and we were gone. Water slipping
by the duct tape, and coming in from every direction, but we were heading
home. For the next day or two she sat out in the garage drying out, but I
had already decided what to do. SB needed a whole new lid